
Ziblo Website: Guide to Customizing Your Public Website
The Ziblo Website section allows you to create, update, and customize the public pages of your establishment directly from the Ziblo platform.
From this area, you can modify texts, images, galleries, informational sections, and visual settings of the site. These changes enable you to present your restaurant, bar, pizzeria, agriturismo, or establishment consistently with its identity, without needing to edit code or use external tools.
You can use Ziblo Website to update the homepage, menu, events, contact information, frequently asked questions, and pages dedicated to quote requests or event organization.
How to Access Ziblo Website
To open the public site editor:
- Log in to your Ziblo reserved area.
- Locate the left sidebar menu.
- In the Platform section, select the Ziblo Website option.
The area dedicated to managing the public pages of your business will open.
The Two Main Areas: Content and Appearance
At the top of the Ziblo Website section, you will find two main tabs:
- Content: for modifying texts, images, galleries, and sections of the site pages.
- Appearance: for customizing general visual elements, such as colors, fonts, and style of the site.
The Content tab is used to update what customers read and see on individual pages. The Appearance tab is instead used to define the overall visual style of the site.
The Structure of Public Pages
On the left side of the workspace, you will find the menu of available pages and sections. Select an item to open its respective editor.
Available areas may include:
- Home
- Header & Introduction
- Intro Section
- Photo Gallery
- Services Cards
- Event / Quote Banner
- SEO Section
- Menu Page
- Upcoming Events
- Organize Your Event
- Frequently Asked Questions
- Contact
Each section controls a specific part of the public website. To achieve an organized and professional result, it is advisable to complete the essential information of the homepage first, then the menu, contacts, events, and other pages.
Home: the presentation page of the venue
The **Home** is usually the first page a customer sees when visiting your venue’s website. It should quickly explain who you are, the type of experience you offer, and how the customer can check the menu, make a reservation, or contact you.
Within the **Home**, you can customize various sections, including:
- the initial header with images and main messages;
- an introductory section dedicated to the venue;
- a photo gallery;
- cards dedicated to services, strengths, or special offers;
- a banner to promote events or quote requests;
- an SEO section to improve the information available for search engines.
Header & Introduction
The **Header & Introduction** section controls the initial part of the Homepage: it is the first visible area for the customer and must communicate the venue’s identity in just a few seconds.
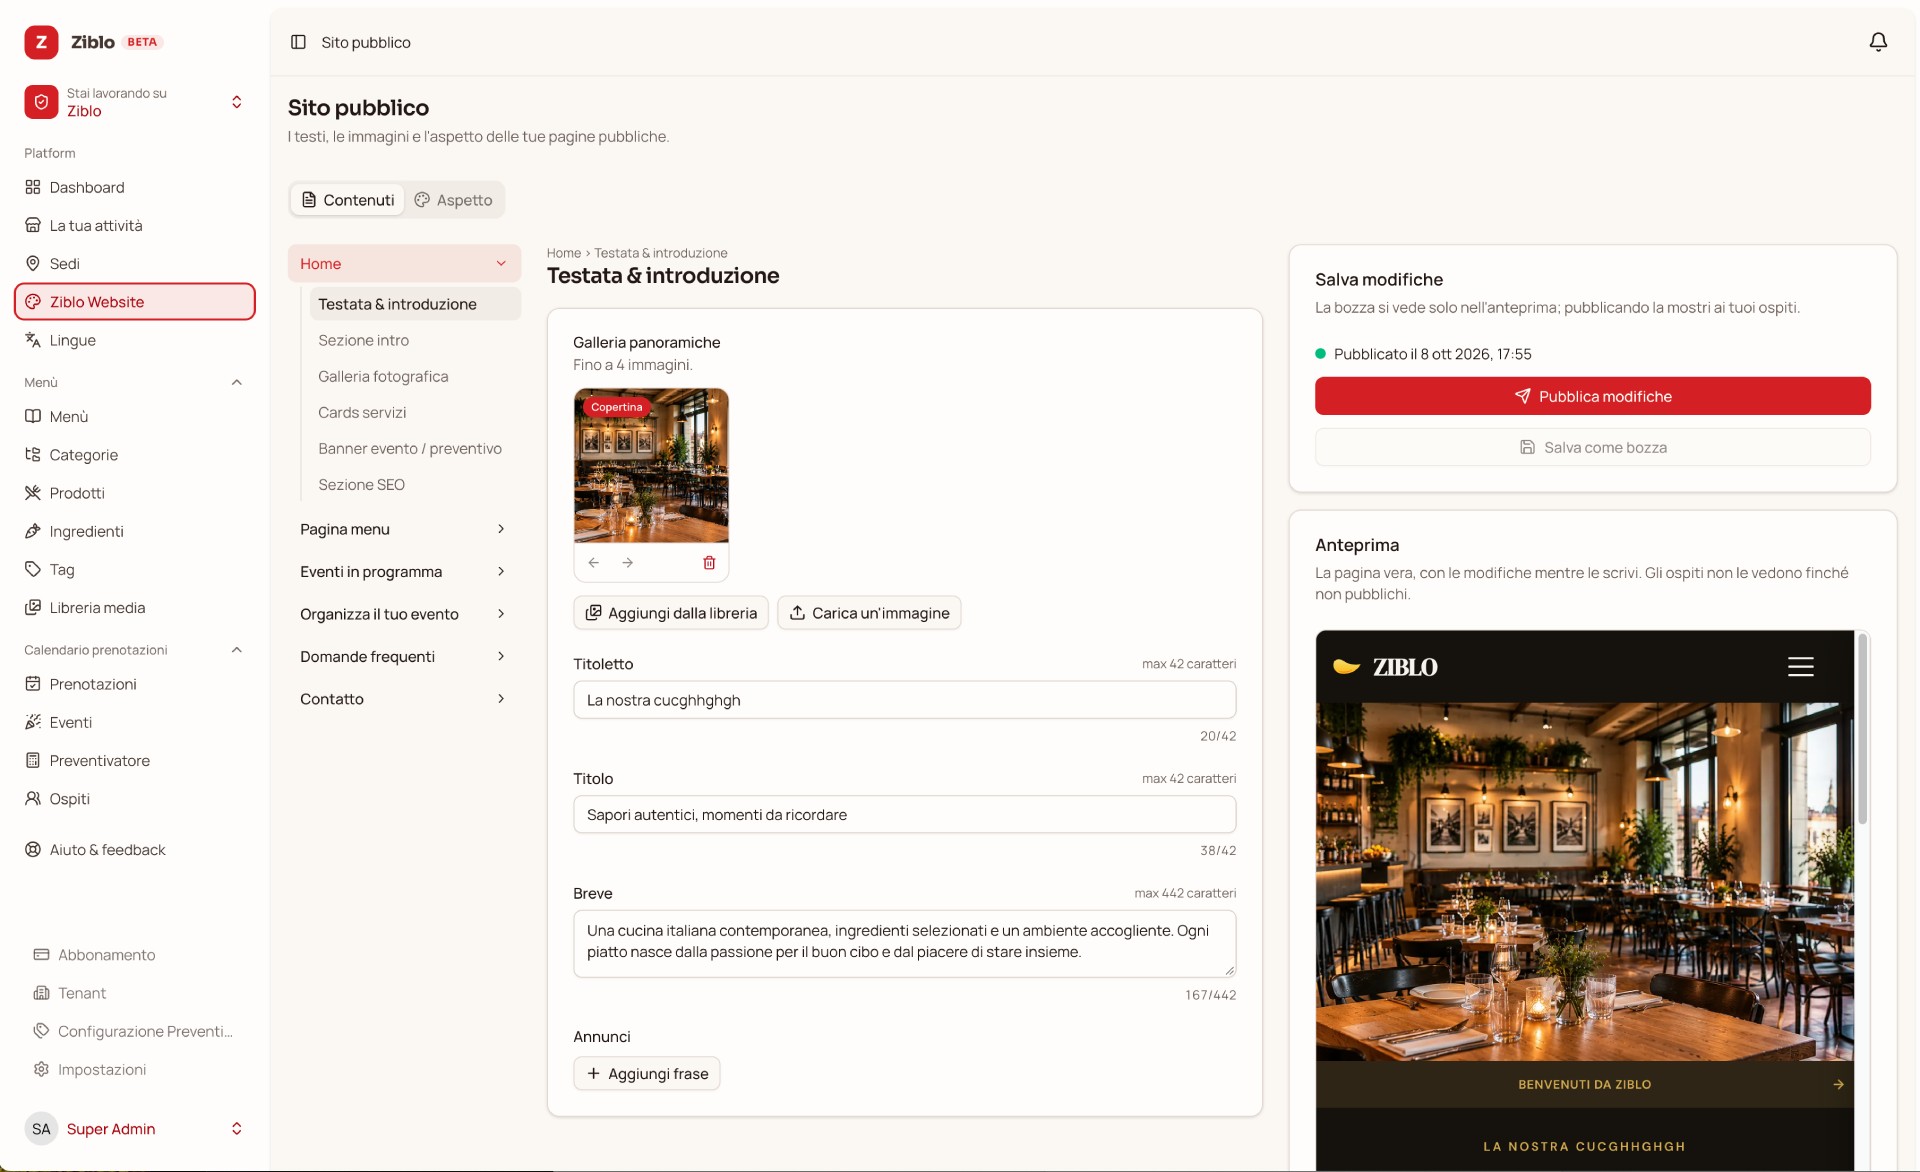
In this screen, you can configure a panoramic gallery, the introductory message, the main title, a brief description, and, if necessary, one or more featured ads.
Panoramic Galleries
The panoramic gallery is used in the website header to showcase the atmosphere of the venue, dishes, spaces, staff, events, or other representative elements of your business.
You can add up to 4 images in the header.
How to Add an Image
To add a new image to the gallery, you can choose between two options:
- Add from Library: use images already uploaded to the Ziblo Media Library.
- Upload an Image: upload a new file directly from your computer or device.
Before uploading a photograph, make sure it is sharp, bright, and consistent with the venue’s image. Panoramic images work best when they display environments, service details, carefully prepared dishes, or representative moments of the experience offered.
Cover, Order and Deletion of Images
After adding images to the gallery, you can use the available controls under each preview to manage the order and visibility of the photographs.
You can:
- set an image as Cover;
- reorder images in the gallery;
- delete an unused image;
- replace outdated images with new photographs.
The image set as Cover plays an important role: it should be the most recognizable and representative photograph of the venue.
Tips for Header Images
- Use horizontal photographs or easily adaptable images for a panoramic view.
- Avoid dark, blurry, crowded, or low-quality images.
- Show your strength: dining room, outdoor seating, kitchen, dishes, view, or atmosphere.
- Do not use images with illegible small text already included.
- Avoid collages, screenshots, flyers, or poorly readable promotional images.
- Update the gallery when the season, menu, or venue layout changes.
The Text Fields of the Header
Below the gallery, you can insert the texts that will appear in the initial section of the Home Page.
Headline
The Headline field is a short phrase displayed above the main title.
The limit is 42 characters. Use it to communicate an immediate feature of the venue, for example:
- Restaurant in the heart of Florence
- Contemporary Tuscan cuisine
- Pizza, beer, and good company
- Events, flavors, and tradition
The title should be concise, readable, and consistent with the main message of the website.
Title
The Title field contains the main message of the header. This field also has a limit of 42 characters.
Use a simple, direct, and easy-to-remember title. You can introduce the venue, the cuisine, or the main offer.
Examples:
- Your table, our taste
- Tradition to savor
- The taste of being together
- Your event starts here
Avoid overly generic or excessively long titles. A short phrase has a greater impact, especially on mobile viewing.
Short
The **Short** field allows you to insert a concise description of your activity. You can use up to **442 characters**.
In this area, you can explain what kind of establishment you are, what type of cuisine you offer, where you are located, or what makes your offer special.
Example:
A place where Italian cuisine meets selected ingredients, authentic hospitality, and a dining room designed to share every special occasion.
Write clearly and naturally. Focus on what helps the customer understand why they should visit your establishment.
Ads
The **Ads** section is optional and allows you to add short messages highlighted in the header or on the Home Page.
To add an ad, use the button:
+ Add phrase
Ads can be useful for communicating temporary information or important messages, such as:
- Open also on Sundays
- Tasting menu available
- Discover our events
- Book your table online
- Organize your private event
Avoid adding too many ads at once. Two or three short and updated messages are usually more effective than a long, hard-to-read list.
Intro Section
The **Intro Section** allows you to deepen the presentation of your establishment after the initial header.
You can use this area to tell the story of your business, describe the philosophy of your cuisine, highlight your team, explain the choice of ingredients, or present the atmosphere.
A good introductory section should answer simple questions:
- What type of venue is it?
- What experience does it offer?
- What is the gastronomic proposal?
- What makes it different or special?
- Why should a customer choose this place?
Photo Gallery
The **Photo Gallery** is the space dedicated to images that tell the story of the venue beyond the initial header.
You can use the gallery to showcase:
- the indoor space;
- the outdoor area, garden, terrace, or view;
- dishes, pizzas, desserts, and drinks;
- the team at work;
- special events and evenings;
- details of the environment and decor.
Insert consistent photographs in terms of lighting, quality, and style. A well-curated gallery builds customer trust and helps convey the real atmosphere of the business.
Services Cards
The **Services Cards** are used to present the main services, advantages, or features of the venue in a concise manner.
You can use the cards to highlight, for example:
- online booking;
- digital menu;
- private events;
- corporate dinners;
- vegetarian or gluten-free options;
- group service;
- outdoor seating or external spaces;
- parking;
- accessibility;
- takeaway or delivery, if available.
Each card should contain a short, concrete, and useful message for the customer. Avoid overly technical texts or generic promises.
Event / Quote Banner
The **Event / Quote Banner** section is designed to promote dedicated requests, such as private parties, birthdays, ceremonies, corporate dinners, events, groups, or personalized quotes.
You can use the banner to invite the customer to contact you and explain in a few steps what types of events you can organize.
A good message can contain:
- the type of event you can host;
- a concrete benefit, such as a reserved room or a customized menu;
- a call to action, for example “Request a quote”.
SEO Section
The **SEO Section** helps you define useful information to improve the understanding of the site by search engines and potential customers.
In this section, insert clear texts consistent with the business. Describe the type of venue, the geographical area, the culinary proposal, the services, and the main occasions in which a customer might choose your restaurant.
Use words that customers might search for online, but avoid repeating the same phrase or words artificially.
For example, a restaurant in Florence might include concepts like:
- restaurant in Florence;
- Tuscan cuisine;
- dinner in the city center;
- restaurant for events;
- online table reservation.
SEO information must always match the services actually offered by the venue.
Menu Page
The **Menu Page** section checks the public page where customers can view the venue’s proposal.
Before publishing or sharing the menu, verify that the following are up-to-date:
- categories;
- products;
- descriptions;
- prices;
- ingredients;
- tags;
- availability;
- product images, if present.
To modify menu items, use the **Menu**, **Categories**, **Products**, **Ingredients**, and **Tags** sections present in the platform’s sidebar.
Upcoming Events
The **Upcoming Events** section allows you to highlight appointments organized by the venue.
You can use it to promote:
- themed evenings;
- tasting dinners;
- live music;
- special aperitifs;
- seasonal events;
- corporate dinners open to the public;
- special parties and initiatives.
For each event, make sure that title, date, time, description, availability, and booking method are up-to-date.
Organize Your Event
The Organize Your Event page is dedicated to customers who want to request information for a private event or group booking.
This area can be used to present options such as:
- birthdays;
- corporate dinners;
- graduation parties;
- ceremonies;
- private aperitifs;
- lunches or dinners for groups;
- custom events.
Clearly explain which services you offer and invite the customer to request a quote through the available tools on the platform.
Frequently Asked Questions
The Frequently Asked Questions section is used to answer the most common customer requests. A well-organized FAQ can reduce phone calls, messages, and doubts before booking.
You can include questions like:
- Is booking necessary?
- Do you accept large groups?
- Are vegetarian or gluten-free dishes available?
- Does the venue have parking?
- Are pets allowed?
- Is it possible to organize a private event?
- What are the opening hours?
The answers must be brief, concrete, and up-to-date. If a condition changes, remember to update the corresponding FAQ question.
Contact
The Contact section contains the information through which customers can reach or contact the venue.
Verify that they are always correct:
- address;
- phone number;
- email address;
- opening hours;
- any links to maps or social networks;
- useful information to reach the location.
A complete Contact page improves customer trust and makes it easier to book, ask questions, or reach the premises.
Save as Draft or Publish Changes
On the right side of the screen you find the Save Changes box. This area lets you check the publication status of the site and choose when to make the changes visible to customers.
In the box you can see:
- the current publication status;
- the date of the last published update;
- available actions to save or publish the work done.
Save as Draft
The Save as Draft button saves the changes made without making them immediately visible to site visitors.
Use this option when:
- you are preparing new images;
- you need to complete a text later;
- you want to review all changes before publishing;
- you are preparing a campaign, an event, or a seasonal update;
- you need a colleague’s or the owner’s approval.
Publish Changes
The Publish Changes button makes the updates immediately visible to site visitors.
Before publishing, always check:
- spelling and clarity of the texts;
- quality of the images;
- correctness of prices and public information;
- presence of all necessary contacts;
- correctness of dates and event times;
- functionality of links and call to action;
- site rendering on smartphones.
Live Preview of the Site
On the right side of the editor, you can also find the **Live Preview**. This is a simulator that shows the site in real-time as you modify texts, images, and sections.
The preview is particularly useful because it allows you to check the mobile view before publishing.
Use the preview to verify:
- if the title is readable;
- if the images are properly cropped;
- if the text is not too long;
- if the cards are ordered and easy to understand;
- if the sections are consistent with each other;
- if the page clearly communicates the identity of the establishment.
Recommended Procedure to Update the Site
When you need to update the public site, follow this sequence:
- Open **Ziblo Website** from the sidebar menu.
- Select the **Contents** tab.
- Choose the page or section you want to modify.
- Update texts, images, or available elements.
- Check the live preview on mobile.
- Save as a draft if the work is not complete.
- Reread the contents and verify important information.
- If everything is correct, select **Publish Changes**.
- Open the public page of the establishment and verify the final result as a customer would.
In Summary
The **Ziblo Website** section allows you to manage the public site of your establishment directly from the Ziblo platform.
You can customize:
- texts and images on the Home Page;
- photo gallery and cover;
- menu and public products;
- services and strengths of the location;
- upcoming events;
- quotation requests and event organization;
- frequently asked questions;
- contacts;
- SEO elements;
- colors and fonts through the Appearance tab.
Use **Save as Draft** to work without publishing immediately and **Publish Changes** when you’re ready to make the updates visible. Thanks to Live Preview, you can check in real time how the site will appear to your customers before publishing.