
First access to Ziblo: how to fill in the welcome window
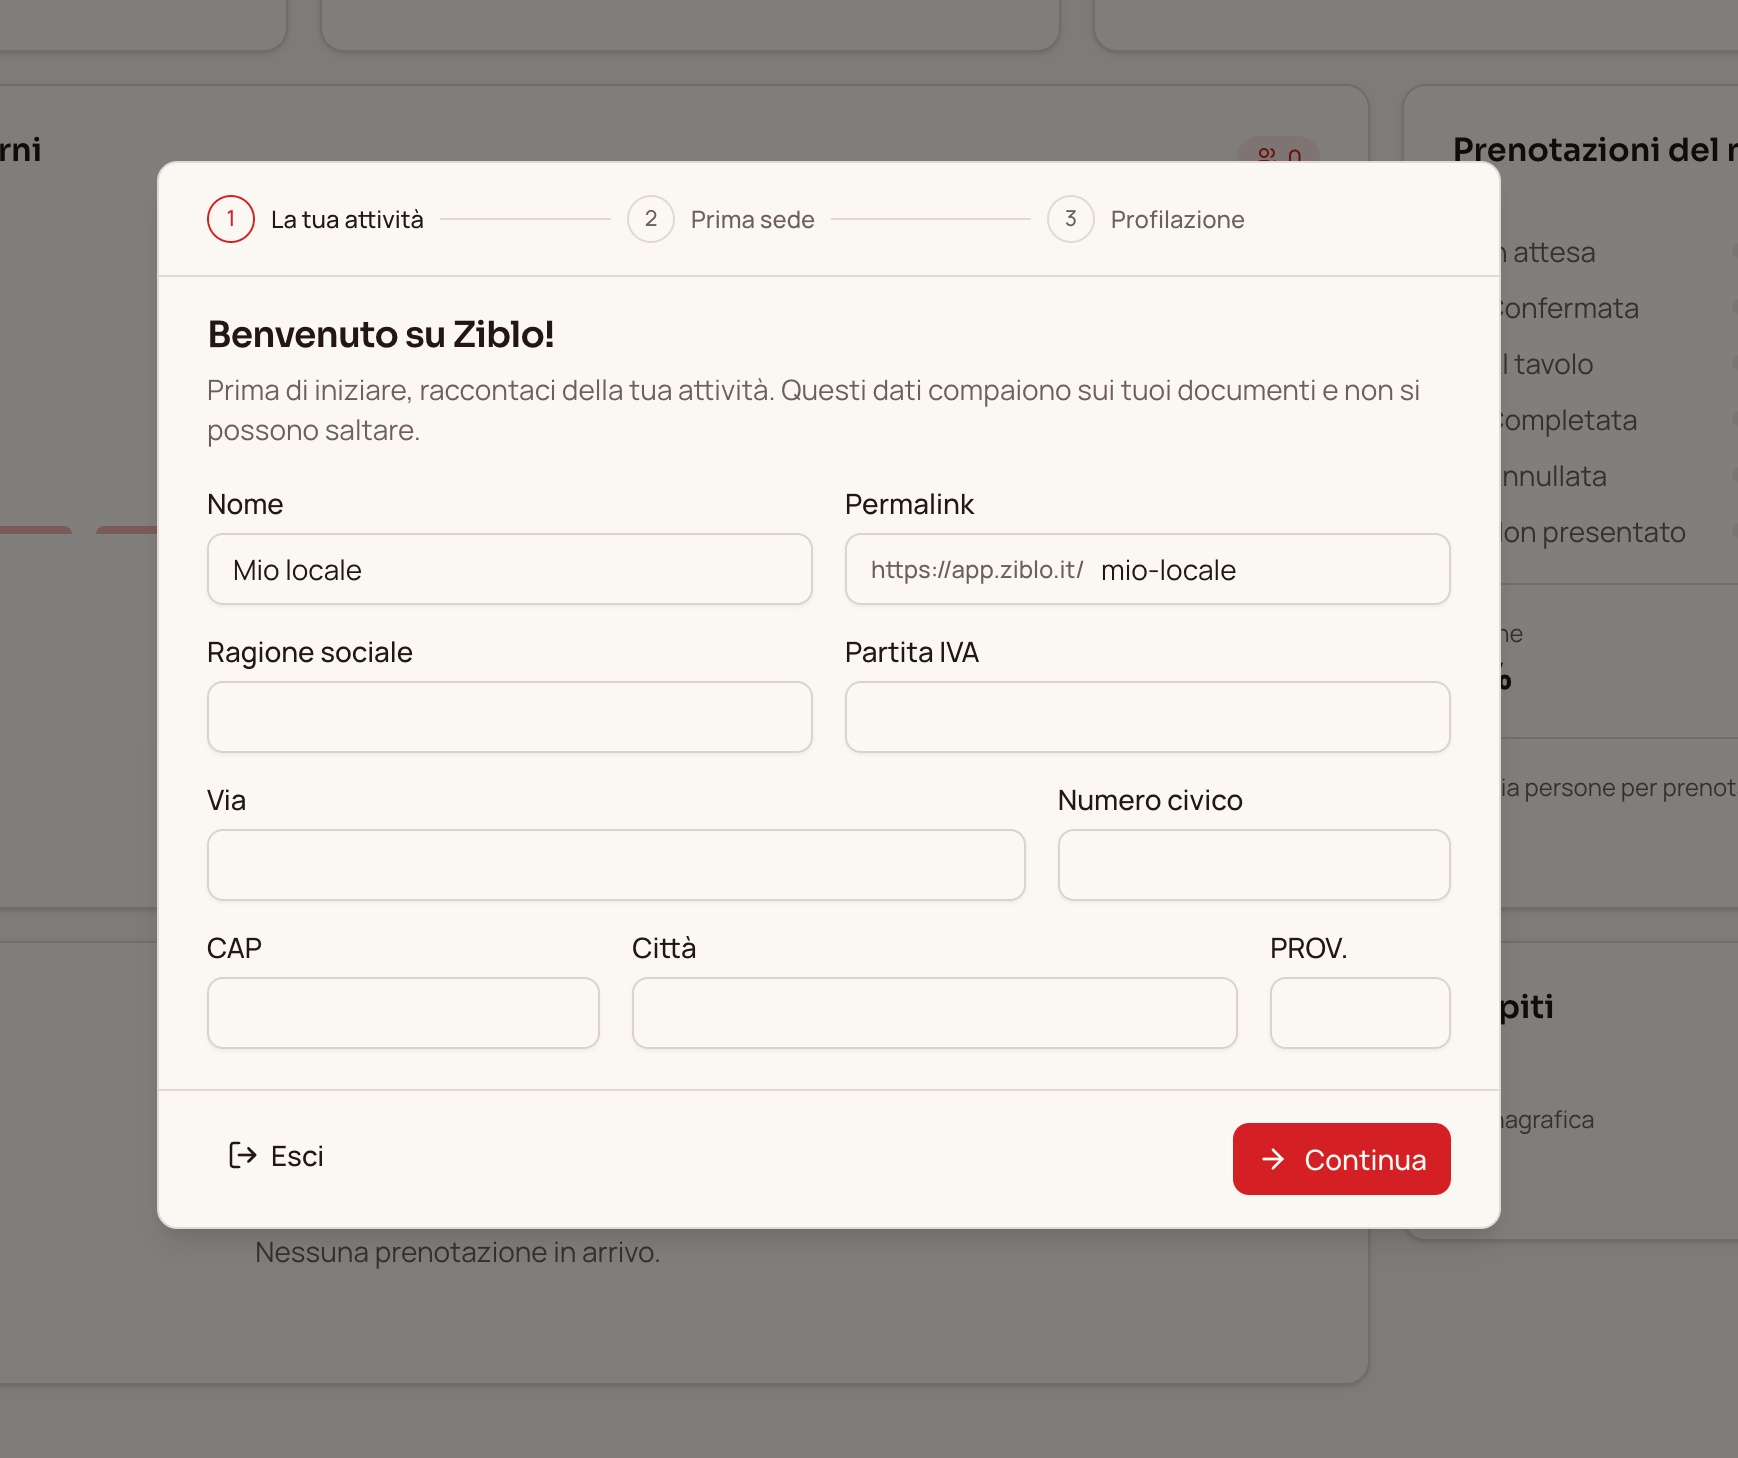
Right after registration, Ziblo opens a welcome window that guides you through the initial setup of your account. It’s the first step to enter your business information and start organizing your venue on the platform.
In this guide, we’ll see how to fill in the first screen, titled *“Your Business”*, and how to proceed with the configuration.
The initial setup: the three steps
At the top of the window, you’ll find an indicator showing the three phases of the process:
- Your Business: entering the main information and company details.
- First Location: step dedicated to configuring your first venue.
- Profiling: concluding phase of the initial setup.
The highlighted number indicates the step you’re currently in. When the window opens, the first phase *“Your Business”* is selected by default.
“Welcome to Ziblo!”: what this screen is for
The initial screen asks you to introduce your business through the name, public address, personal details, and business address.
As indicated in the welcome message, these details appear on your documents, and they cannot be skipped. Before starting, make sure you have the company information of the venue you manage at hand.
Name: how customers recognize you
In the *“Name”* field, enter the name of your business, for example, that of your restaurant, pizzeria, bar, or agriturismo.
Use the name under which the venue is known by customers. The commercial name may differ from the legal name, which you’ll need to specify in the dedicated field.
Example:
- Local name: Osteria del Centro.
- Legal name: Rossi Ristorazione S.r.l.
If you find a provisional name like “Mio locale”, replace it with the actual name of your business before proceeding.
Permalink: the address of your public pages
The “Permalink” field defines the web address associated with your business on Ziblo.
The address consists of a fixed part, https://app.ziblo.it/, and a final part that identifies your establishment. In the example shown in the window, the result is:
https://app.ziblo.it/mio-localeThe final part of the address is also called the “slug”. It is the name that allows you to distinguish your public pages from those of other businesses on the platform.
How to choose the name for the public address
Choose a simple and easily recognizable identifier. For example, for a restaurant called “Osteria del Centro” you can use:
osteria-del-centroThe full address will be:
https://app.ziblo.it/osteria-del-centroTo make the address easy to read and share:
- use the name of the establishment or a short version of it;
- prefer lowercase letters;
- separate words with hyphens instead of spaces;
- avoid accents, symbols, and unnecessary numbers;
- check for typos.
In the field, you only need to fill in the final part of the address: the prefix https://app.ziblo.it/ is already shown by the platform.
Legal Name and VAT Number
These two fields identify the subject managing the business. Fill them out using the data reported in the company documentation.
Legal Name
Enter the official name of the company in the “Legal Name” field. Do not replace it with the sign name, if the two names are different.
For example, if customers know the place as “Pizzeria La Terrazza”, but the company is named “Bianchi Ristorazione S.r.l.”, in the field you must enter the latter.
VAT Number
In the “VAT Number” field, enter the one belonging to the company managing the activity.
Before proceeding, verify that the number is complete and matches the legal name indicated. Pay attention to any leading zeros.
The Address of the Activity
At the bottom of the window, you’ll find the fields dedicated to the address. Fill them in with the requested business data for this first phase, avoiding confusion with the “First Headquarters” configuration, which is the next step.
Street and Building Number
In the “Street” field, write the name of the road, square, or locality. Enter the building number in the separate “Building Number” field.
For example:
- Street: Via Roma.
- Building Number: 25.
Postal Code
Enter the postal code of the address indicated. Check that it is complete and consistent with the municipality.
City
In the “City” field, write the full name of the municipality, avoiding abbreviations that could make it unclear.
PROV.
In the “PROV.” field, enter the province abbreviation, for example, “FI” for Florence.
Check your data before proceeding
Before moving on to the next phase, verify that:
- the name is the actual name of your establishment and not a temporary text;
- the permalink is clear and error-free;
- the company name matches the business data;
- the VAT number is correct;
- street and house number are entered in their respective fields;
- postal code, city, and province are consistent with each other.
This check is important because, as indicated in the window, the information entered is used on your documents.
The “Continue” button
After completing and reviewing the data, select the red “Continue” button, located at the bottom right.
This is the command to use to proceed with the configuration towards the “First Seat” step. If Ziblo reports a missing field or data to correct, complete the requested information before trying again.
The “Exit” button
At the bottom left, you will find the “Exit” button. Do not use it to advance in the configuration: to proceed to the next step, select “Continue”.
The screen does not specify whether the entered data is saved when you exit before continuing. If you interrupt the procedure, check the information present when you return to the configuration.
Do you need help with the first access?
If you don’t know which data to enter, have difficulty with the permalink, or cannot proceed, contact Ziblo support by writing to servizioclienti@ziblo.it.
Specify the email address used for registration, the name of the activity, and the issue encountered. If an error message appears, include its text or attach a screenshot, without including passwords or login credentials.